HomeGroup is a new service in Windows 7 that allows end-users to share files and printers with other computers running Windows 7 operating system in home networks. With home groups, users can share pictures, music, videos, documents, and printers with other people in the same homegroup with permissions support, or stream media to devices.
Not everybody will use HomeGroup feature though. For user who doesn’t use the HomeGroup feature in Windows 7, such as not creating a homegroup or doesn’t join any homegroup, the “HomeGroup” branch and icon will still be displayed in the navigation pane of Windows Explorer. To remove the HomeGroup folder from the Windows 7 Explorer navigation pane, whether it’s simplified Windows 7 style navigation pane or class full folders tree, follow below steps.
How to Hide and Remove HomeGroup Folders by Disable and Turn Off Home Group Sercives
1. Go to Control Panel -> Network and Internet -> HomeGroup, and click on Leave the homegroup link to unjoin from any existing home group.
Note: If the home group are shared and hosted from the PC, all HomeGroup connections will be disconnected.
2. Click on Leave the homegroup to confirm leaving from the home group.
3. Click on Finish when done.
4. Go to Control Panel -> System and Security -> Administrative Tools, and double click on Services. Alternatively, type services.msc in Start Search.
5. For each of the following two services:
HomeGroup Listener
HomeGroup Provider
Do the following:
Stop the service, and then double click on the service to open Properties dialog, and set its Startup type to Disabled. Click OK when done.
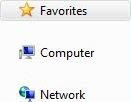
6. The HomeGroup icon and group will no longer be shown in the navigation pane of Windows Explorer in Windows 7, as shown in illustration below.
Check out more Windows 7 usage hacks or tips and tricks.
Saturday, September 5, 2009
Disable and Turn Off HomeGroup Services to Hide or Remove Home Group from Windows 7 Explorer
Subscribe to:
Post Comments (Atom)


No comments:
Post a Comment